Effective date: 15 November 2026
From a new account to a client domain at p=reject, in the order you will do it. Each step says which plan it needs; the FAQ answers the questions in between. Fleet has everything Harbor has, so "Fairway and above" and "Harbor and above" include Fleet. Your own domain and single sign-on are on Admiralty only.
1.Create your account and workspace§ Link
- 1.Sign up with your work email address and a password, then open the confirmation link we email you. Or sign up with Google or Microsoft: a Google account or a personal Microsoft account is confirmed already, and a work or school Microsoft account whose organisation has not verified its email domain gets a confirmation link first. A password found in a known data breach is refused, so choose one you have not used elsewhere.
- 2.Create a workspace: your agency's name. You confirm the Data Processing Agreement and the Terms of Service on the same screen, because a workspace cannot exist without them.
- 3.Turn on two-step verification from your account's security page. As the owner you can require it for everyone in the workspace.
Every account starts on Mooring, which is free. Move to another plan from Billing when your client book needs it.
2.Add a client and its domains§ Link
- 1.Open Clients and add a client: the company whose domains you look after.
- 2.Add its domains one at a time, or paste a list. Each domain belongs to one workspace only; if another workspace already monitors it, you are told. If the client's DNS is on Cloudflare and you have added a Cloudflare connection (step 3), choose Import domains on the connection under Settings, DNS publishing instead. It lists the zones the token can see, marks the ones already monitored here or by another workspace, and adds the ones you tick to the client you choose, with the same plan limit and checks as a pasted list.
- 3.For each domain, publish the ownership record shown on its setup page:
| Host | Type | Value |
|---|---|---|
_dmarc-harbor-verification.<domain> | TXT | dmarc-harbor-verification=<token> |
The record is on the setup page as soon as the domain is added. Publish it, then press Check DNS now. DNS can take a few minutes to an hour to update; checking again is safe.
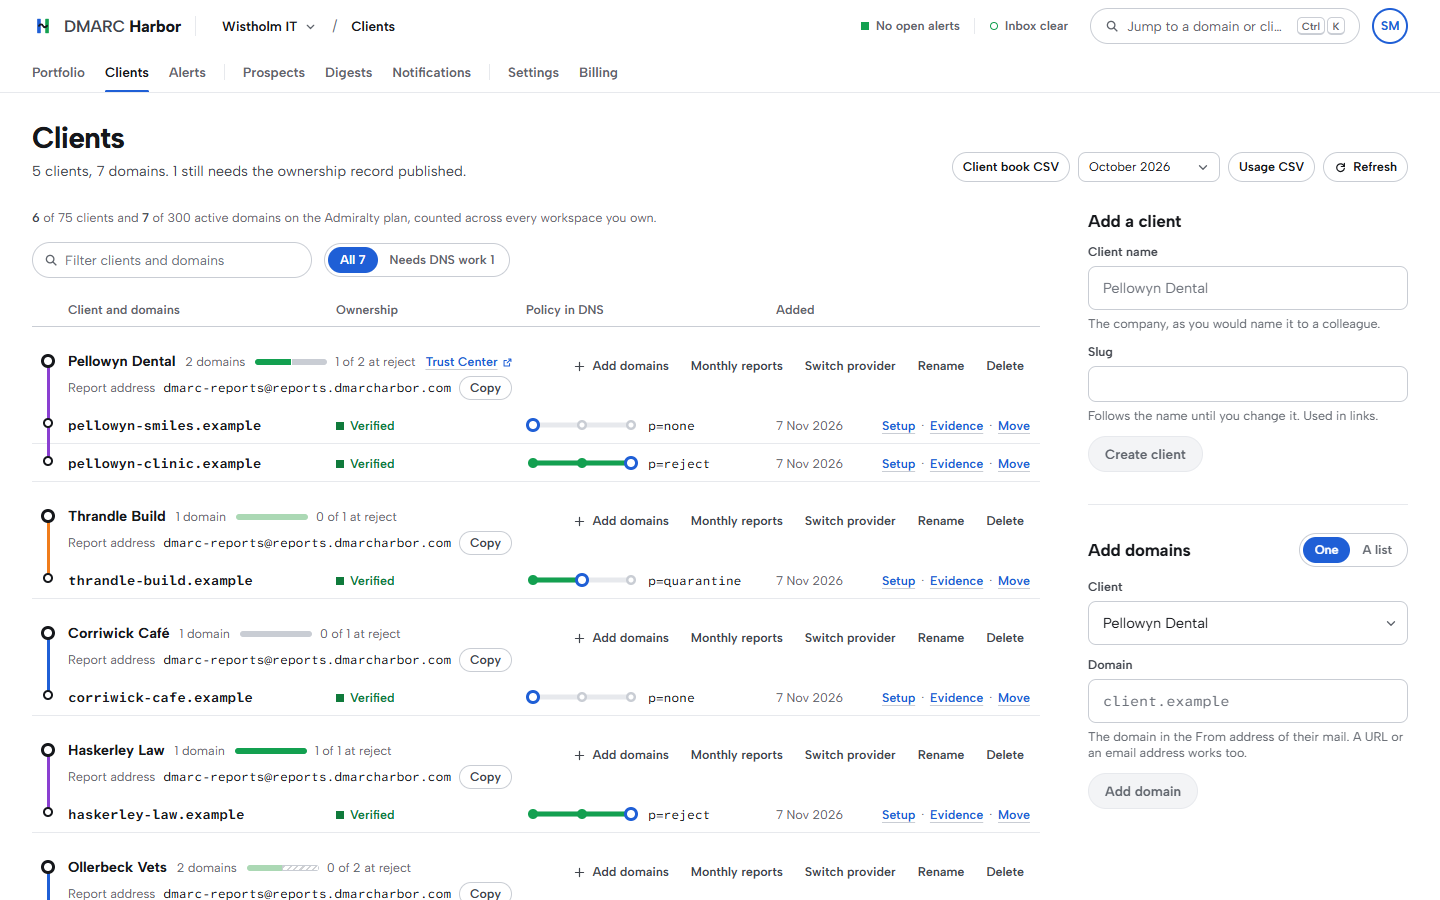
Put a domain under the wrong client? Choose Move on its row. Its reports, alerts and history go with it, and the confirmation says what changes first.
3.Start receiving reports§ Link
Pick one of three ways.
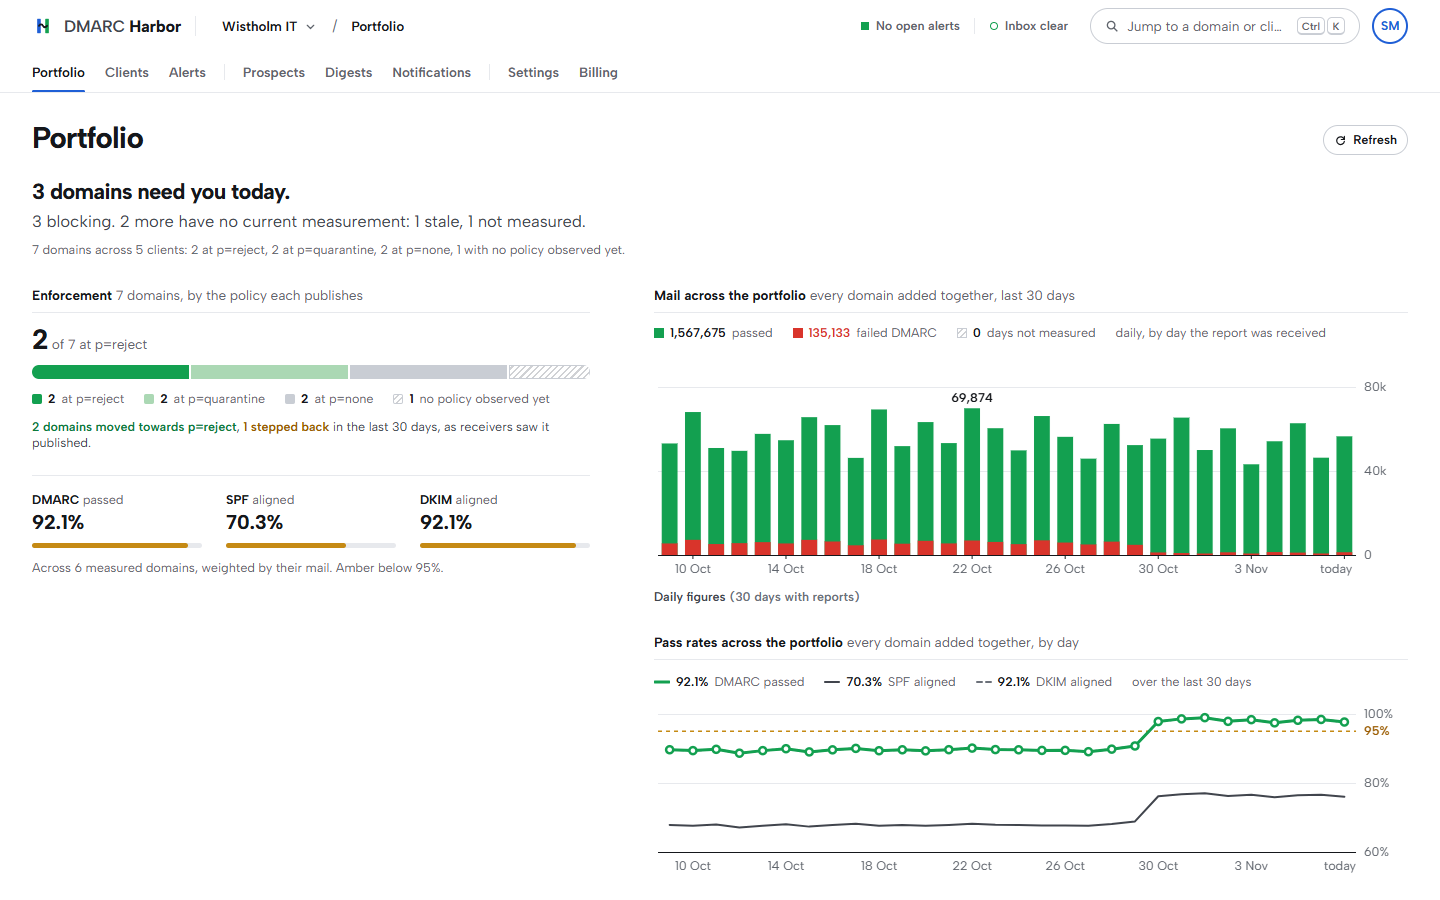
- Publish a DMARC record yourself. The setup page gives the exact record, starting at
p=nonewith this client's reporting address. If the domain already has a DMARC record, keep it and add our address to itsrua=list. - Publish through Cloudflare (Fairway and above). Add a Cloudflare connection under Settings, DNS, with an API token that can edit DNS for the zone. Preview the change on the domain's page, publish it, and put the old value back if you need to.
- Host the DMARC record (Fairway and above). Point
_dmarc.<domain>at us with the CNAME shown, and remove the old TXT record in the same edit. From then on, every policy change is made on the domain's page with no DNS edit.
Moving from another DMARC service? Open the client's switch kit. It reads what each domain publishes and gives you a record that reports to both services while you move, so no data is lost on the day you switch.
Reports usually arrive within 24 to 48 hours. Until then the domain reads as unmeasured.
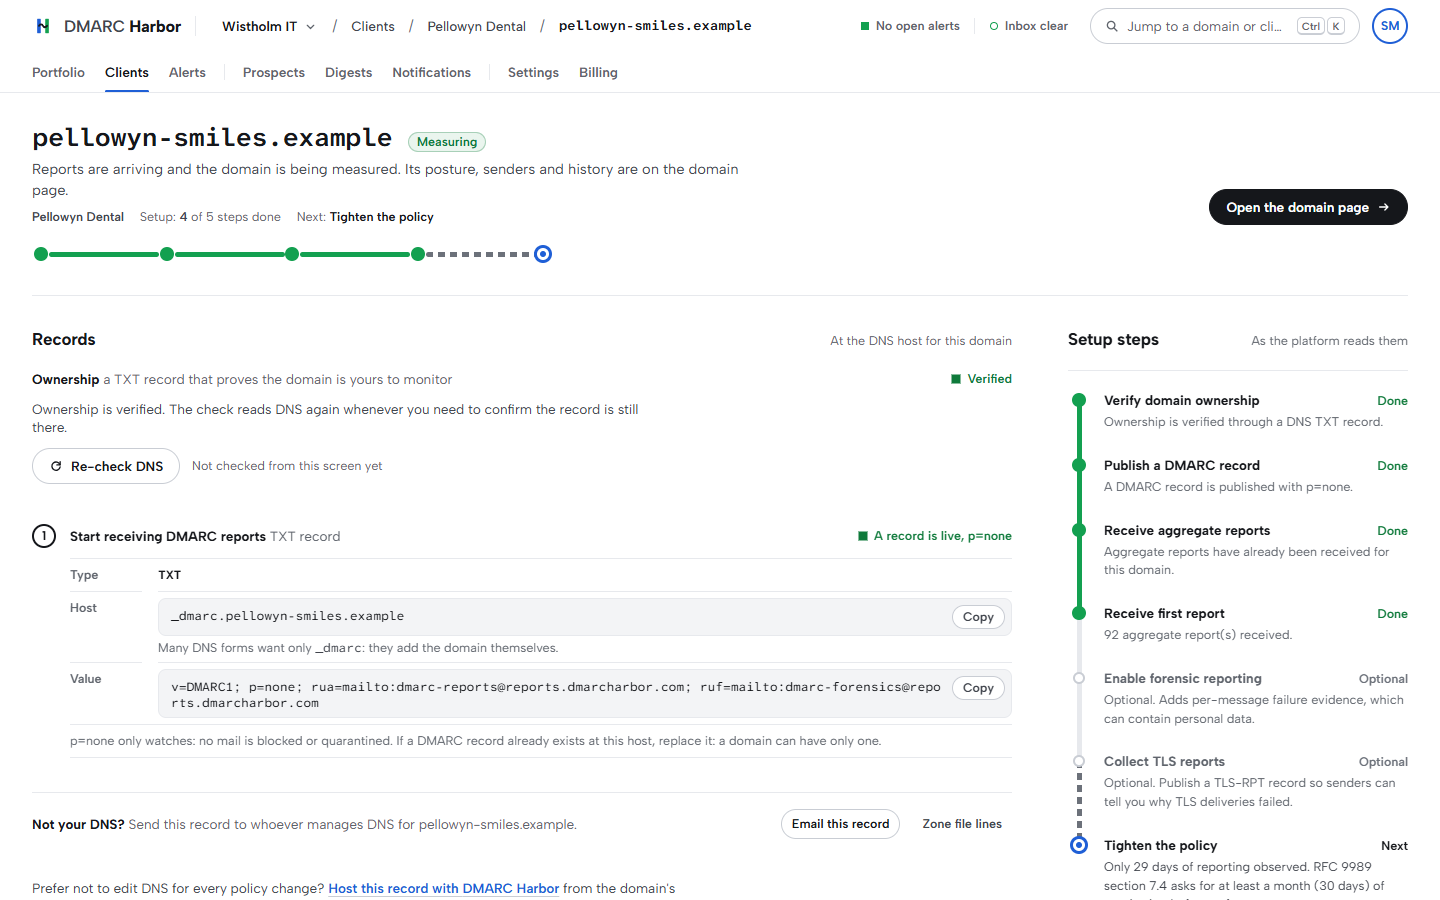
Once reports arrive, the Portfolio adds every domain together: how far your clients have moved towards p=reject, the pass rates weighted by mail, and each day's mail, passed and failed. A day with no report is hatched, never drawn as zero.
4.Review who sends as the domain§ Link
The domain page draws its mail as lines, one per sender, through the SPF and DKIM checks to the inbox. Mail that failed both checks is the dashed red line, and it ends where the published policy sends it. Below are each sender's share of the mail, the mail by day and the pass rates by day.
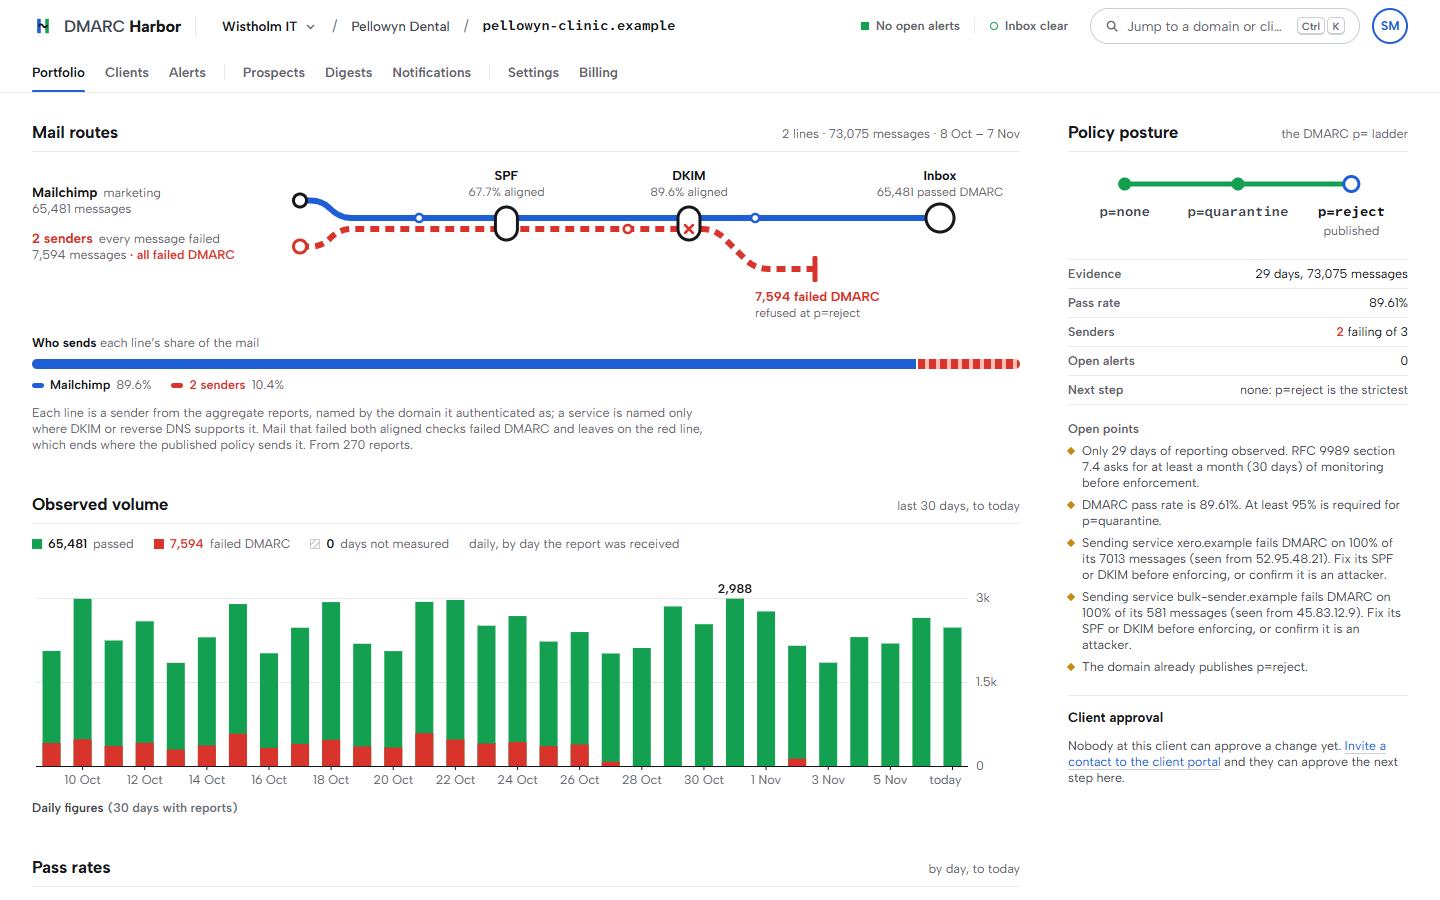
- 1.Open the domain and its Senders tab. Each row is a service or server that sent mail as the domain, with how much of its mail failed.
- 2.Mark each sender as yours or not yours. Fix the SPF or DKIM of the ones that are yours and failing; the reason they fail is shown beside them.
- 3.On Fairway and above, name an owner for each sender, so the person fixing it is recorded.
- 4.Open the Subdomains tab. It lists names below the domain, such as
news.example.com, that sent mail in the last 90 days and that you do not monitor. Monitor the ones that belong to the client (each counts as a domain on the plan), and dismiss the rest.
If SPF is over the 10-lookup limit, managed SPF (Harbor and above) publishes a flattened record from the services you list and keeps it current.
To tidy SPF (Fairway and above), open Reporting and setup and choose Check SPF sources. Each include and address range in the record is matched against the servers that sent the domain's mail in the last 90 days. A source marked "No mail seen" is a candidate to remove, which frees its lookups; confirm with the client first, because a service that sends rarely may not show up in 90 days. Nothing is called unused until there are reports on at least 14 days. On the free plan, every scan still counts the record's lookups and warns when it goes over 10.
5.Get told when something changes§ Link
- Alerts (Fairway and above): create rules per domain for failure rate, failure count, volume from one source, report silence or new unauthenticated sources. Alerts go to the people you choose by email.
- Slack and Teams (Fairway and above): under Settings, connect up to 20 Slack channels and 20 Teams channels. Each can take every client or chosen clients, and every kind of message or chosen kinds (failing mail, spoofing and new senders, reports stopped, DNS changes, domain expiry), so each client's alerts can go to that client's channel. Send a test message from each channel to check it before a real alert depends on it; the page shows what Slack or Teams answered. After a downgrade a connected channel can still be paused or removed.
- PSA tickets (Harbor and above): connect HaloPSA (ConnectWise PSA and Autotask are in early access, set up with us), map each client to a PSA company, and alerts open, update and close tickets.
- Webhooks (Fairway and above): send signed events to your own systems. An endpoint can be limited to chosen clients, and its signing secret can be rotated with a period in which the old and new secrets both sign. The details are in the API documentation, under Webhooks.
- DNS and expiry: every plan keeps each domain's DNS change history and its registration expiry date. Fairway and above send warnings about both.
6.Bring in your team§ Link
Under Settings, Members, invite colleagues by email as an admin, analyst or viewer. Open invitations count toward your plan's team size, which is per workspace: Mooring 2, Fairway 5, Harbor 25, and Admiralty and Fleet have no limit. On Admiralty you can connect SAML or OIDC single sign-on instead.
The role table on the Members page says what each role can do. An invitation lasts two days; an expired one moves to its own list, frees its place, and can be sent again. The workspace has one owner, and the owner can hand it to a member under Transfer ownership, confirming with their password or an authenticator code. The new owner's plan then applies, and the transfer is refused if their plan has no room for the workspace, its clients, its active domains or its team, open invitations included.
7.Give your client a view§ Link
- Client portal (Harbor and above): under Settings, Client portal, invite a contact at the client by email. They get an email with a link to the portal. Someone new there chooses Create an account, uses exactly the invited address, and opens the verification link; someone who already has an account with that address just signs in. They see their own domains, senders and monthly reports, never forensic data, and they cannot see any other client. To stop a contact's access, revoke it on the same page.
- Share links (Fairway and above): a read-only report for one domain that opens without signing in, and expires when you choose.
- Digests and monthly reports (Harbor and above): a scheduled email summary, and a PDF per client for each month.
- Usage for billing (Harbor and above): on the Clients page, pick a finished month and download a CSV with each client's domains, reports, messages and alerts, so you can bill them for what they used.
- Trust Center and compliance pack (Harbor and above): a public page and a PDF with a recorded fingerprint that show each domain's authentication evidence and state what data is held, by whom, and for how long.
- Your brand (Harbor and above): your name, logo and colours on the portal, monthly reports, Trust Centers, prospect reports and client emails, which come from our shared address with your agency's name unless you send from your own address (below). These open at our address. Under Settings, White label, Client contact, add a support email and a support page: clients see them in the portal and on the sign-in page on your own domain, and replies to client emails go to your support email. On Admiralty, add your own domain under Settings, White label, and publish the TXT and CNAME records it shows. If your DNS host proxies records (Cloudflare's orange cloud), set the CNAME to DNS only. Once the page says it is live, everything a client opens is on your address: the portal and its sign-in, share links, Trust Centers, prospect reports, and the links in monthly report and password reset emails. Clients sign in there with email and password; Google and Microsoft sign-in are not offered on your domain. Admiralty can also send client emails from your own address: under Email from your domain, add one on a subdomain such as
reports@mail.youragency.example, publish the DKIM and SPF records it shows and check them. Until it is verified, and if the records are later removed, client emails come from our shared address with your agency's name.
8.Move to enforcement§ Link
- 1.Open the domain and read its Policy posture panel. It shows the evidence and names what still blocks the next step: too few messages or days, a failing sender, open alerts, or for
p=rejectless than a month atp=quarantineor too little DKIM. - 2.When the evidence supports the step, change the policy:
- On a hosted record, choose the policy on the domain's page and publish it.
- Through Cloudflare, preview and publish the new record.
- Otherwise, publish the record yourself.
- 3.To have the client approve first (Harbor and above), use Client approval under the policy ladder. Every portal contact at the client is emailed; whoever answers first decides, and the decision is recorded under their account. A hosted record changes the moment they approve; otherwise you get the record to publish.
- 4.Go in stages:
p=none, thenp=quarantine(optionally as a trial witht=y), thenp=rejectafter at least a month at quarantine.
9.Add the rest of the protection§ Link
- TLS reports (Fairway and above): publish the TLS-RPT record shown on the domain's page to see delivery problems to the domain's mail servers.
- MTA-STS (Harbor and above): hosted MTA-STS serves the policy file and record, so receivers must use TLS when delivering to the domain.
- BIMI (Harbor and above): hosted BIMI serves the logo, and the certificate if you have one, once the domain is at enforcement.
10.Win new clients§ Link
Under Prospects (Fairway and above), check the domain of a company you want to win and send them the link. They read a plain-language report under your name, with an example of the fake invoice a criminal could send as them; you see how often it was opened.
When something is not working§ Link
No reports after two days. Check the domain's setup page: the DMARC record must be live and list this client's reporting address in rua=. A rua=https:// address is not collected; add our mailbox address beside it.
The domain will not verify. The TXT record must be at _dmarc-harbor-verification.<domain>, not at the domain itself, and its value must match exactly. Some DNS hosts add the domain to the host name for you, which turns it into ..<domain>.<domain>.
"Already monitored by another workspace". A domain can belong to one workspace only, so reports are never split. Ask whoever added it to remove it, or contact support.
"Plan limit reached". The message says which limit and which plan raises it. Clients and active domains are counted across every workspace you own; a domain that has stopped reporting stops counting 30 days after its last report.
A sender I recognise is failing. Open it on the Senders tab. It shows whether SPF, DKIM or alignment failed, and from which addresses. Fix that service's DNS or its own settings, then wait for the next day's reports.
An invitation is refused. The workspace has reached its plan's team size. Remove someone, cancel an open invitation, or upgrade.
I want to read a domain's records as receivers see them. The free tools (Free tools in the site header) read any domain's DMARC, SPF, DKIM and BIMI records from public DNS, count SPF lookups through every include, write a DMARC record to publish, read an aggregate report file and read a message's headers. No account is needed, and the two readers upload nothing.
A client's mail service needs SPF or DKIM. The provider setup guides (Guides in the site footer, or Setup guide beside a known sender on the Senders tab) give the records and steps for Microsoft 365, Google Workspace, Zoho Mail, Mailchimp, SendGrid, HubSpot, Amazon SES and Mailgun. The glossary explains every term.
Still stuck? Email support@dmarcharbor.com.